.png)
Sunday, September 22, 2013
Wednesday, October 31, 2012
Happy Halloween!!!
Happy Halloween everybody! I am excited for the party this weekend and to see all the pics of kids I know in their costumes. Unfortunately, we live in an apartment complex where no one trick or treats so I won't be getting any little kids at my door. I had two last year and was SOO excited that I think each one got a whole bowl of candy.
I wore a wig to work and plan on wearing one tonight. I am going to a hockey game with a friend so I'll probably dress up for that. What do you wear to work on Halloween?
I wore a wig to work and plan on wearing one tonight. I am going to a hockey game with a friend so I'll probably dress up for that. What do you wear to work on Halloween?
Monday, October 22, 2012
31 Halloween Projects 3- Cake Stands
This is a very quick and simple project made from things I found at the dollar store or around the house.
If you are crafty or on Pinterest constantly like I am then you have, I'm sure, seen lots of DIY cake stands. You can make them out of almost anything. I have seen candle sticks, tart pans, pie plates, cups, plates and many other things used to make a stand. A few photos from Pinterest are below to show some of the range of things you can use.

^ This project uses a glass dinner plate and glass candlestick holder as the base.

^ This looks like a ceramic dinner plate and a white candlestick holder.

^ Here they used a dessert cup and dinner plate (pink) and a martini glass and dessert plate (orange) and then spray painted it so it was one uniform color.

^ This one is one of my favorites because I like that it's a little bit unusual. They have stacked up coffee cups, tea cups and a variety of different plates all in white. Very artistic but maybe not as practical to actually put food on.
Here is my version.

^ At The Dollar Tree they sell these neat platters that are very thin and light but are coated with metal, probably aluminum or nickel. It's hard to capture in a photo but they have neat etchings across the bottom and the edges are decorative. I have been buying these for a few years because I like the neat sort of 'old house' feel I get from them, especially as you use them and the metal changes a little.

I wanted to keep the trays the way they were so I looked for something for the bottom that would not only compliment the trays but looks nice on it's own since I would not be painting them. I liked the look of the oval trays best (I had the choice of square, rectangular, round or oval) and the glass candlestick holders worked well. I liked them because they were relatively thin and didn't take up a lot of room on the tray so more food will fit. I had a few votive holders at home that I was going to use but since I specifically wanted seven matching trays I bought all my supplies this time.
The construction part was incredibly easy. I set down one candlestick holder and squeezed E6000 adhesive around the top edge of the glass where it would touch the try. I they tried my best to get the candlestick holder in the center of the tray by just eyeing it. I pressed firmly for about 15 seconds and then let it dry for a minute. I then put adhesive on the bottom edge of another candlestick holder and tried to line it up with the first, gluing it on top of the try this time. Another tray went on top and I had a two tier cake stand. I ended up making 2 single tier stand, a double tier stand and a triple tier stand. I would not suggest taller than three with the height of base I was using because I think that would be too tall and might fall over. After I was finished I liked the look of the double stand so much that I glued to the 2 single tiered stands together and I now have 1 triple tier stand and 2 double tiered stands. They do not look overly Halloween so I can use them throughout the year but I can also spook them up. Mine will hold jello shots this year.
NOTE: If you DO decide to paint your stand be sure to use food safe paint, not all paint is safe to eat off of. If you're not sure if your paint is safe then either look for a food safe clear coating or be sure to always use napkins, doilies or something to put between the stand and the food.

Here are my finished stands. I am very happy with them. IF I this project again I might try finding the center of the trays ahead of time and marking the bottom so they lined up neater than mine do now but they are not unstable so it'll work.
I spent $1 per tray and $1 per candlestick holder and I had adhesive on hand. This was a total of $14 for me. It could be less if you use dishes you have at home already or find cheap at a garage sale or flea market. You can also keep the cost down by making one instead of three.
What do you think? What serving pieces are you looking for? How can my instructions be better? Let me know!
~Liz
Tuesday, October 16, 2012
31 Halloween Projects-2 Snake Wreath
Project 2 of our 31 Halloween Projects is just fixing a project that I did last year but since I started ALMOST from scratch I thought I would still share it. Last year I made a wreath that was covered in rubber snakes and painted all black. It ends up looking like a crazy snake nest since it is all one color and the snakes overlap so much.


^ This is the inspiration that I got from Martha Stewart. She had a really neat idea and I really like that it was matte and subtle.
Last year I found a wreath of branches at Hobby Lobby on sale half price (love a deal) and hot glued rubber snakes all over it and then sprayed it with black multi purpose paint. It looked great and my mom even asked for one when she saw mine. I was so excited.

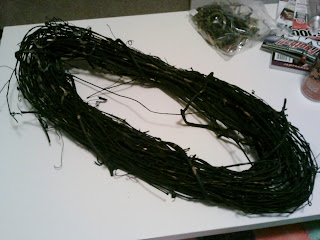
^ This is how my wreath looked this year. All my snakes fell off! I fell in love with this shape when I saw it because I thought it looked a little creepier and less store bought. The extra twigs that were not trimmed off made it look even better. This looks like a perfect snake den to me, feel free to experiment with different shapes and sizes. You can also make them in different colors or you can add details to the snakes so they stand out more.


^ You can see all the spaces where the paint is missing because the snakes are gone this year. I was pretty disappointed that ALL of the snakes fell off before I even used it one season. This is not from packing or storage, they came off the next day!


^ I pulled all of the extra hot glue off of the wreath, it came off pretty easily. I was just left with a black wreath with some weird spots on it.

This is where you would start if you did not have to do any repairs and had a fresh wreath to work with.
I ordered more rubber snakes from OrientalTrading.com and started to glue them back on to the wreath.

Since hot glue was clearly not working I decided to go with a sure fire adhesive, E6000. I started using this in Art class in high school since it glues almost any surface to any other surface and is strong while it is still easy to work with.
I like to spread the snakes out as I glue so that I get the wreath covered pretty evenly, if you like it more random then do it however looks good to you.

^ Here is a photo of the wreath once all of the snakes were glued on. The bright colors make it easy to see where I placed the snakes and how they are woven together and through the twigs organically.

^ I wanted to show you my spray painting set up also. I usually paint my projects at my parents' house since they have the room and we live in an apartment but I was impatient and had a small area to paint this time. I used a plastic tablecloth folded in half, I taped it to the balcony railing so I would protect that surface and then taped it to the ground so the wind would not move anything.


I sprayed the wreath with satin black paint and covered every inch that I could see. This was a really quick process since the wreath was already mostly black. It takes a little longer when you do it the first time because you really have to spray it from every angle. I did a general coat on the front and then just rotated it around to get all the sides. Once it was dry I sprayed it from the back and inspected it for any hints of color or unpainted twigs. (I actually noticed a spot that I missed after it was hung and took it down to do another quick spray.)

Here is the finished wreath.

And here it is hanging on my door. I really love the way it turned out.
Tell me what you think. Any suggestions for making a different version? Anything I can do to explain the process better? Leave me a comment.
~Liz
Friday, October 12, 2012
Monday, October 8, 2012
31 Halloween Projects-1 Googly Eye Photo Frame
Ok, I am getting ready to get a ton of projects finished up and am really excited to see what you think of them! I am officially starting off the 31 Halloween Projects posts with number one, a googly eye photo frame.
I, of course, found the initial inspiration on Pinterest. Here are a couple of photos I have found floating around.


Below is my version.
I found a wooden frame and some googly eyes at Michael's. I also had on hand green paint, paintbrushes, multi-purpose glue, ribbon and a cut out.


I took some close up photos so you could see all the different eyes I found. I got a package with lots of different sizes so I had very large (bigger than my eyes) and very very small (the top of a stick pin). One package had different colored backgrounds, I only really loved the green ones from that package because they matched my background perfectly so I didn't use a lot of them. Another package had eyelids and eyelashes painted on the front of them. There was even a package that had different colored irises (the inside of the eye).


I, of course, found the initial inspiration on Pinterest. Here are a couple of photos I have found floating around.

^ This is the one I liked best and is pretty close to what I ended up with. The original link is here.
^ Here is another one I found. This looks like it is just a photo that was taken and pinned so I am not sure where it came from.
Below is my version.
I found a wooden frame and some googly eyes at Michael's. I also had on hand green paint, paintbrushes, multi-purpose glue, ribbon and a cut out.

I started by painting the frame all over on the front and back. This is a terrible photo of the color by the way; it is a very bright, almost neon, green.

I then opened my bags of googly eyes and started to spread them around on my frame. I bought several different packages because I wanted different kinds of eyes on my frame so I opened all of the packages and poured them in a large bowl so I could easily pick out the ones I wanted. I started with the largest eyes I had so that I could space them out the way I wanted.


Optional: Put the large googly eyes on your face and make creepy faces with your husband.

Keep adding eyes and fill in the spaces as you go. I tried to vary mine as much as possible so it would be random.

The sizes of eyes you use and the space you have to fill will help determine where to put everything. Just keep filling it up.


I took some close up photos so you could see all the different eyes I found. I got a package with lots of different sizes so I had very large (bigger than my eyes) and very very small (the top of a stick pin). One package had different colored backgrounds, I only really loved the green ones from that package because they matched my background perfectly so I didn't use a lot of them. Another package had eyelids and eyelashes painted on the front of them. There was even a package that had different colored irises (the inside of the eye).

This is the jar of what I have leftover, you can see more of the colors that were included that I didn't use.

Keep adding more and start paying attention to the colors as you add them so you don't have too many of the same ones together.

Once it was all finished I was so excited! I love the way it turned out and a few finishing touches was all it needed. I touched up any areas that needed more paint and found some ribbon and a Halloween scrapbook punch out that I had.

The ribbon is self adhesive so I just cut it to length and wrapped it around. I used vellum dots to attach the label so it would stay nicely. Tip: I made sure to paint the back nicely and wrap the ribbon all the way around the back since mine is on a stand and you will be able to see the back of it. I bought the frame in the broken/discount section because it didn't have the stand on the back so I bought a cheap plate display stand at the dollar store and used that.
I spent a total of $8 on my frame and I just love it. You could save money by getting a frame at the dollar store or using one package of eyes instead of the 5 that I bought (I had a TON leftover). Hanging the frame on the wall or getting one that isn't broken will also save you from the display cost.

Here is the finished product with my fave photo from last year in it. This is a photo of all the costume contest winners and I just love how goofy they all are.
Leave me comments with your questions. Is there anything I can do to make the instructions easier or clearer for you? Let me know.
~Liz
Thursday, October 4, 2012
Slap on the Wrist
I have been a terrible blogger and neglected this blog all year long practically and here we are IN October and I haven't posted anything for you guys to see yet. Damn. Well I promise that once I get past whatever is making me so sick I will start posting for my 31 Halloween projects! I already have several mostly finished so get ready for some fun stuff!
~liz
~liz
Subscribe to:
Posts (Atom)